Crochet Golden Daisy Lace Runner Pattern (Free)
A free, beginner-friendly pattern that clearly guides you through the steps.
Published October 12, 2026 · by Emma
- Skill level
- Intermediate
- Yarn weight
- Size 3 mercerized crochet cotton
- Hook size
- 2.5 mm (B-1)
- Time
- 8–10 hours
- Gauge
- 12 dc and 10 rows = 10 cm
- Yardage
- about 250 m
- Sizes
- 112 x 32 cm (44 x 12.5 in)
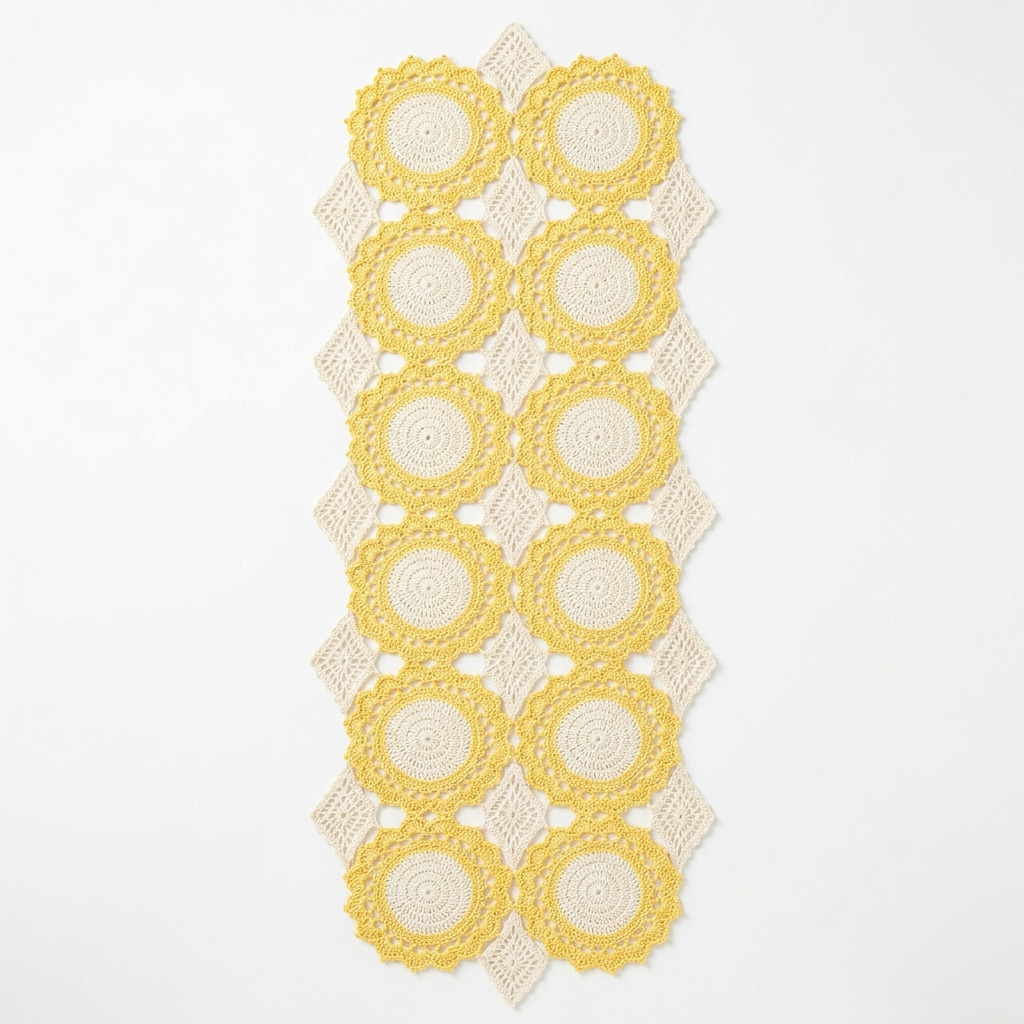
This crochet Golden Daisy Lace Runner pattern makes a stunning two-tone table piece that combines circular arch medallions with elongated filet diamond appliques. The construction is more interesting than your typical doily, as you'll crochet 14 separate medallions and 14 filet diamonds, join them into a grid, and layer the diamonds on top of each medallion. It might sound complex, but each piece is straightforward once you understand the rhythm.
This pattern suits intermediate crocheters who are comfortable with treble crochet and filet techniques. If you've made doilies or worked with thread before, you'll feel right at home. If this is your first thread project, take your time with the gauge swatch, and don't skip blocking to ensure a beautiful finish.
Why You'll Love This Golden Daisy Lace Runner
- Beautiful heirloom-quality piece – this runner adds a touch of elegance to any table setting.
- Engaging construction – enjoy the combination of medallions and filet diamonds for a fun crafting experience.
- Versatile color scheme – use butter yellow and ivory for a fresh spring look, or customize with your favorite colors.
- Great skill expansion – improve your skills with treble crochet and filet techniques while creating something special.
Is This Pattern Good for Beginners?
Yes! If you're familiar with basic stitches and ready to take on some new techniques, this pattern will help you grow as a crocheter. Just remember to take your time and enjoy the process.
Crochet Abbreviations (US Terms)
- ch = chain
- sl st = slip stitch
- sc = single crochet (insert hook, yarn over, pull through, yarn over, pull through both loops)
- hdc = half double crochet
- dc = double crochet (yarn over, insert hook, yarn over, pull through, yarn over, pull through two loops, yarn over, pull through remaining two loops)
- tr = treble crochet (yarn over twice, insert hook, yarn over, pull through, [yarn over, pull through two loops] three times)
- st(s) = stitch(es)
- sp = space
- RS/WS = right side/wrong side
- rep = repeat
Special stitch definitions:
- Filet cell = ch 2 followed by tr in the next tr. An open cell has two chains between its treble posts.
- Picot = ch 3, sl st in the first of those three chains to create a small decorative loop.
Size and Gauge
- Finished dimensions: 112 x 32 cm (about 44 x 12.5 in) after blocking.
- Gauge: 12 dc and 10 rows = 10 cm (4 in) for circular medallions.
Getting gauge right is essential for lacework. Make a gauge swatch before you start to ensure you achieve the correct size.
How to Crochet a Golden Daisy Lace Runner (Step by Step)
Step 1: Circular Medallions (Make 14)
The body is worked in rounds starting with an adjustable ring.
- Round 1 (Color B): Make an adjustable ring, ch 3 (counts as dc), 15 dc in ring. Tighten ring, join to top of ch 3. (16 dc)
- Round 2 (Color B): Ch 4 (counts as dc + ch 1), [dc in next dc, ch 1] 15 times. Join to third starting chain. (16 dc, 16 ch-1 spaces)
- Round 3 (Color A): Join in any ch-1 sp, ch 1. [Sc in next ch-1 sp, ch 3] 16 times. Join to first sc. (16 sc, 16 ch-3 arches)
- Round 4 (Color A): Sl st into first arch, ch 1. [Sc in next arch, ch 5] 16 times. Join. (16 sc, 16 ch-5 arches)
- Rounds 5–7 (Color A): Repeat the previous round with increasing chain numbers (ch 7 and ch 9 in Round 5 and ch 11 in Round 7).
- Round 8 (Color B): Join in any outer arch. [5 sc, picot, 6 sc] in each arch around. Join and fasten off. (176 sc, 16 picots)
Make 14 identical medallions. When blocking, pin each outer picot evenly around a 16 cm circle.
Step 2: Elongated Filet Diamonds (Make 14)
The body is made in rows, starting with a foundation chain.
- Row 1 (Color B): Ch 7. Tr in seventh chain from hook. (2 tr posts, 1 open cell)
- Row 2: Ch 6, turn. Tr in first tr, then create additional cells following the pattern.
- Continue adding rows following the established pattern until you have 14 diamonds.
Make 14 diamonds total and block them elongated, ensuring the widest point measures about 9 cm.
Step 3: Placement and Assembly
Set up your layout with all circles right side up in a 7 x 2 grid.
- For joining medallions, complete lengthwise connections and crosswise connections.
- Ensure that you have 14 medallions joined correctly, with no twisted circles.
Step 4: Attaching the Diamonds
Center each diamond on a circle, securing it lightly with small stitches.
- Ensure that each diamond lies flat and does not collapse open cells during sewing.
Step 5: Edging and Finishing
Finish your runner by weaving in all ends and blocking to the finished size.
- Allow the runner to dry fully before removing pins.
Beginner Tips for a Great Lace Runner
- Use colorfast cotton from one dye lot for consistency in color.
- Don't rush the blocking process; it significantly affects the final look.
- Keep your tension even throughout to prevent inconsistencies in stitch size.
Common Mistakes (and How to Fix Them)
- My stitches are too tight. This usually happens if I’m not relaxed while crocheting. Make sure to crochet comfortably and check your tension.
- The shape looks off. This might mean I neglected to count my stitches correctly. Always recount your stitches if the shape seems different from the pattern.
- My medallions ruffle. This issue could be due to the number of repeats being incorrect. Double-check your count and adjust your hook size if necessary.
How to Care for Your Lace Runner
Hand wash in cool water with a mild detergent. Avoid wringing it out. Roll it in a towel to remove moisture and reblock flat.
FAQ
Can I use a different yarn?
Yes, you can use different yarns, but make sure it is of a similar weight and fiber content to achieve comparable results.
How long does it take to make this runner?
On average, it might take you 8–10 hours, depending on your experience and comfort level with the techniques involved.
What if my gauge is off?
If your gauge doesn’t match, consider adjusting your hook size. This will help ensure that your finished pieces are the correct size.
Looking for more? Check out our cozy collection of home decor patterns.
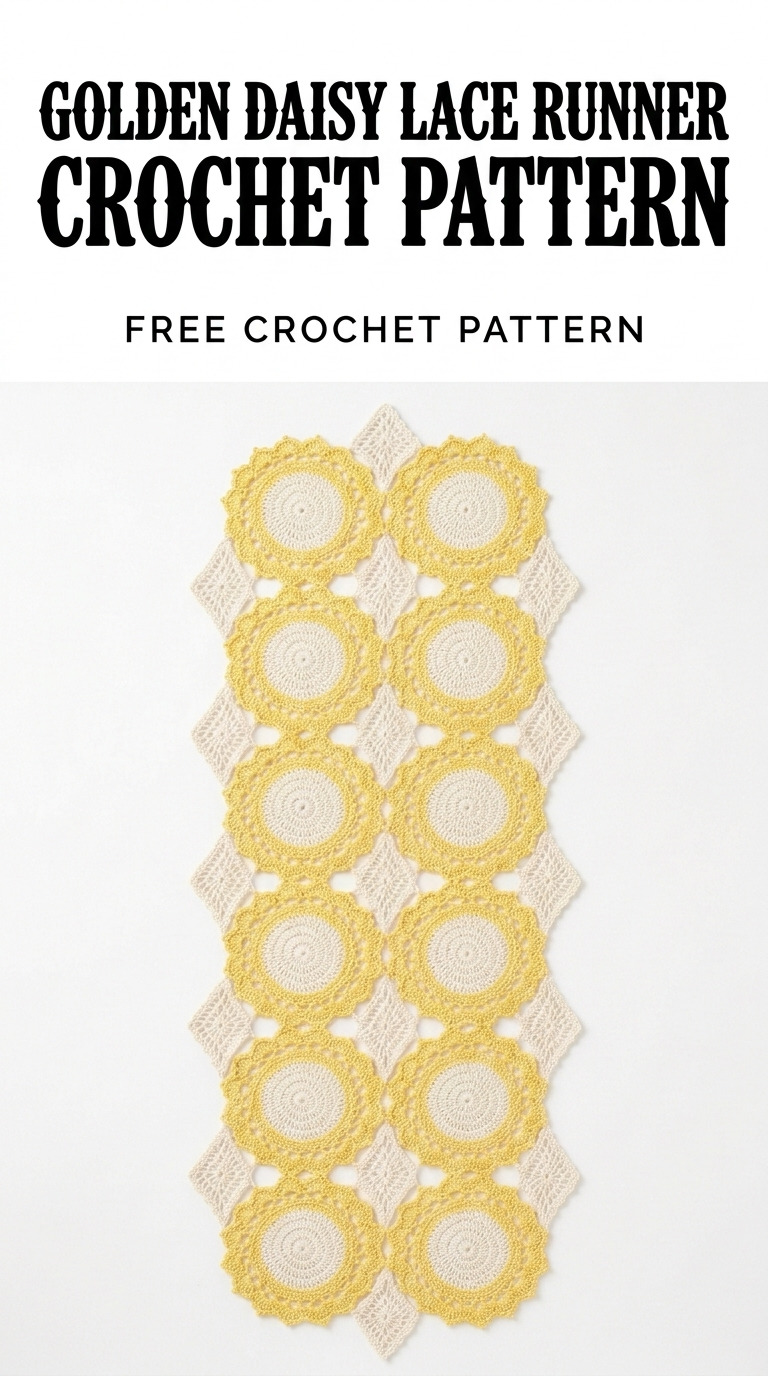
Image shown for inspiration — your finished result may vary slightly.